Mobile developers, more than ever, need to create applications ready for a savvy marketplace – users expect responsiveness, good content and a coherent experience throughout the app.
To achieve that we want to be sure our app is ready for change. That’s why it’s important to set up a well thought-out architecture for our project so we could easily get access to every component and update it. We also want to reassure ourselves that every time we add more features to our applications they behave as expected and that’s why we apply tests to it. Plus, in the off chance of breaking anything whilst pushing a commit we want to be aware of it asap.
So, that’s three key concepts to consider in every project: architecture, continuous integration and testing. In this blog post, I will go into the details of ustwo’s Android strategy when it comes to these foundational elements. In particular, how the Model View Presenter pattern allows us to get our application ready for testing and how continuous integration anchors play nicely with Firebase Test Lab – testing in real devices with multiple different configurations.
We have captured this process in an open-source Android boilerplate – a tool which allows us to kickstart our own projects as well as share knowledge with the community and gather feedback. This was something which I was able to present at GDG Porto – watch my talk or read on for a more in-depth exploration.
Process Flow
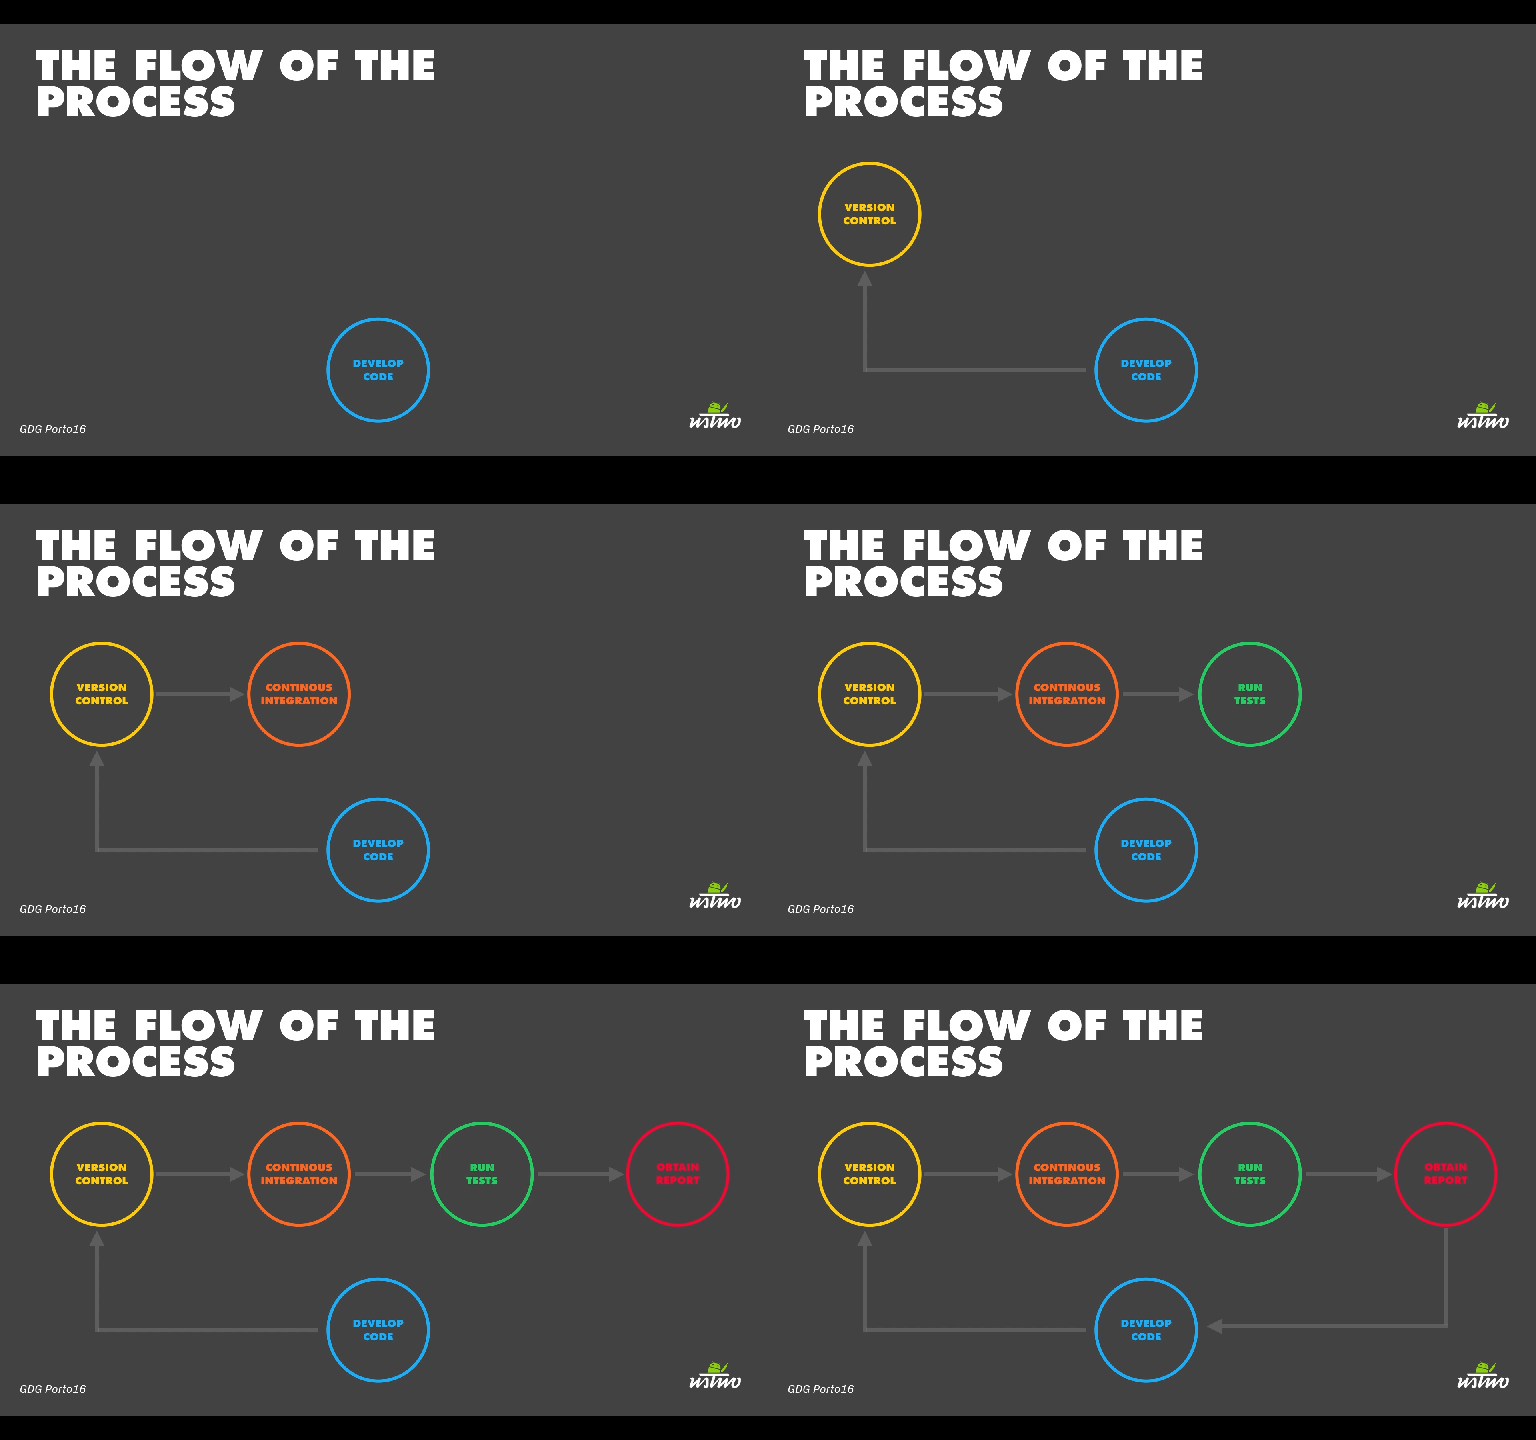
Every time we commit new code into our version controls tools we should be assured that everything's working as it should – we need to know that nothing broke in previous developments.
We could easily achieve that by implementing a continuous integration process to bridge the flow between committing code and the building process.
Since we’re building our application then why not just apply some tests to validate our components and logic? Each time we push new code into our repositories, we test the build – improving the resilience of our project.
On the off-chance anything happens, the build breaks or the tests fails, then a quick report – email, Slack message or any other medium – will give us the alert that something needs fixing. Sooner, rather than later.
How does ustwo develop for Android?
As we all know, there’s no such thing as the perfect architecture. There’s always some trade-offs that we’ll need to make. That’s why we need to adapt to the project at hand, understand the constraints and caveats and, from there, define the best possible scenario.
Nonetheless, we could try to come up with an easier scaffolding solution to enable us to apply a more decoupled structure where you can apply tests to different components.
That’s why at ustwo we decided an Android architecture should take into consideration the Model View Presenter pattern, dependency injection, packaging by features and tests.
Let’s take a quick look at each one to get a better understanding about how this might all play out.
Model View Presenter
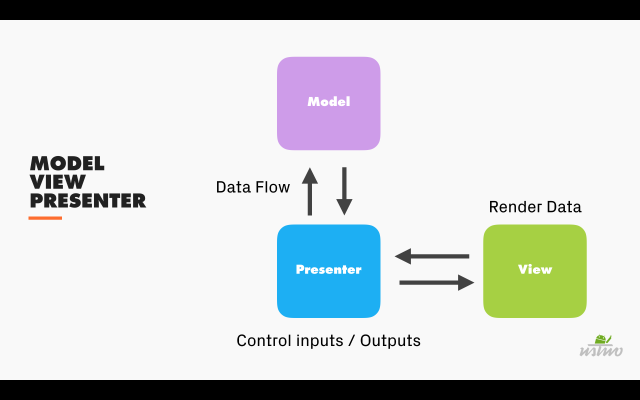
Whilst the internet is awash with information on the Model View Presenter (MVP) pattern, I’m going to give a quick overview of how it works so we can better understand why it makes sense using it. Using MVP, means avoiding having our view embedded with business logic and a clearer understanding of what we’re trying to achieve within that component.
In the image above, we can see the graphical representation of the MVP architecture and the how the entities relate to each other. The model's data flows through the presenter, that passes to the view what needs to be rendered. The presenter will have all the necessary calls to pass the model to our view. Our view will only care about controlling its life cycle and updating the data from the presenter. This way, we separate our view logic from our business logic – since the view logic is handled in the view and the business logic is handled in the presenter.
One of the key factors in using this type of pattern is the fact that it grants us more flexibility when developing components of the application. We can change/update any view we like and our business logic doesn’t change.
Plus, every presenter is built using pure Java logic allowing us to quickly apply unit tests – since we don’t depend on the Android framework to run the tests.
Dependency Injection
Dependency Injections have many functions. They give us more control over our environment, control the centralisation of our object creation and give greater support for testing by applying mocks.
Our presenters will mainly implement dependency injections with the purpose of supporting testing. Mocks can then be injected so we don’t have to create a new instance every time they are needed, thus adding more control to our environment. All centralised objects can then be created and shared between multiple presenters.
Package By Feature
From the moment we kickstart a new project within Android Studio, our file structure already creates a module for the app module. So why not continue that flow and create a service module to implement all the necessary services to make requests and pull data into the app from a backend service?
Plus, since we decoupled the network layer from our application layer – why not keep the package by feature, making it easier to find a class as we just need to look for the feature we developed?
Tests
Since we’ve already implemented a Model View Presenter architecture, we’re allowed to isolate business logic and easily add some unit tests. This way we can use small parts of our presenters in total isolation (mocks for everything) and test the input and outputs of our data flow.
By applying Espresso, we can pretty much test all UI elements – from performing actions to validating data.
Continuous Integration

The clear benefit of using continuous integration is to have an early identification of inconsistencies in the build process. From the start it can alert you to any problems, including when a project won’t be able to be built.
Furthermore, we can add tests to the build process that will automate the testing suite – making our project even more robust.
For bonus points, we can even apply continuous delivery – unlocking the possibility of deploying the application wherever, whenever and to whomever we want to.
So, we just need to find a continuous integration service that will adjust to our project needs – thankfully the internet isn’t short of those services – the hard part is making the right choice.
For us, the CI service needs to be compliant with three key features:
- Integration with our repository (GitHub)
- Free – since we wanted to validate if this would be a good solution in the long run
- Able to run UI tests
With that in mind CircleCi ticked all the boxes: easy to set up, features an emulator that can run UI tests, cheap maintenance cost and you can access and debug contained builds.
With this service, every time a new build is triggered a new virtual container is spun up, the project GitHub repository cloned, the circle.yml configuration file in the root of the project is read and used in defined the process. The CI then installs all the dependencies required to build this project, runs static analysis tools (lint, findbugs, pmd, checkstyle) if required, runs tests and archives artifacts.
In a nutshell, a simple script would look like this:
test:override:\# start emulator- emulator -avd circleci-android22 -no-audio -no-window:background: trueparallel: true\# wait for it to have booted- circle-android wait-for-boot\# run tests against the emulator- ./gradlew connectedAndroidTestMore details about setting up CircleCI in Android here and in this great step-by-step tutorial.
Circle CI downsides
Unfortunately Circle CI doesn’t support KVM emulation. That means longer build times if you are using emulator, since arm emulators take their time to boot. Plus, you’ll need to take into consideration the time needed to boot up a new container every time you build it – and that’s when Firebase enters the scene.
Firebase
As we know “Firebase is a mobile and web application platform with tools and infrastructure that helps developers build quality apps.” However, for Andoid projects the only feature we’ll need is the Test Lab – which allows us to run our UI tests.
Test Lab
Firebase Test Lab for Android offers us with a cloud-based infrastructure for testing applications. That means that you can initiate testing of your app across a wide variety of devices and device configurations (e.g. Nexus5 in landscape mode or Samsung Galaxy S7 in French). Not only do you have the opportunity to run with different models but you also have access to a device farm that will allow you to run code in real devices.
Test results include logs, videos and screenshots which are made available in your project in the Firebase console with every run. Even if you haven't written any test code for your app, you can still use Test Lab to look for crashes by running a robo test. The integration is very straightforward – you can use a web client to access the user interface of the firebase console:
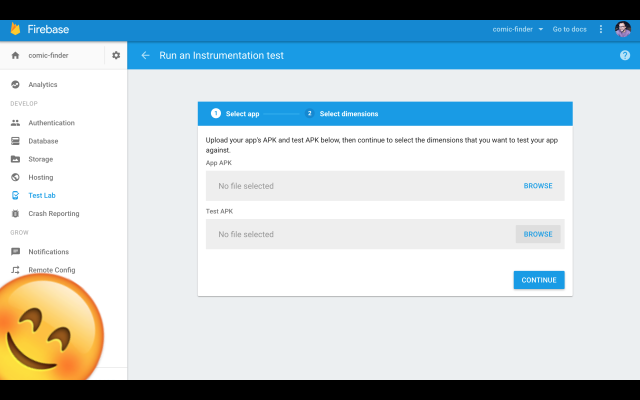
Or access firebase testing lab through Android Studio within the menu Tools / Firebase:
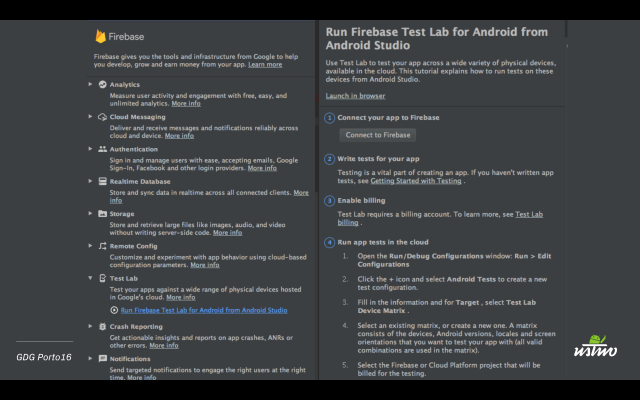
Or even simpler just (and more powerful)add it to your circle.yml file, like so:
gcloud beta test android run --type instrumentation --app app.apk --test app-test.apk --device-ids Nexus5 --os-version-ids 1 --locales en --orientations landscapeThis way everything is running in the background and you get a nice report back when the tests are finished.
Android Boilerplate Setup
With all this in mind we decided to create an Android boilerplate setup to help quickstart our own projects as well as open it up to the community, where we could help and inspire others to have a faster setup with all those nice features.
These are some of the features that we already have available:
- Screenshots - simple to visualise any bugs
- Remote testing just by giving API keys - up and running in no time
- Lint - improve code structure.
- Checkstyle - keeping everyone on the same page
- Code coverage - you've got your back covered
- DexCount - the dreaded 65k limit
- Deploy - saves your APK ready for release
- Encrypted secrets - no releasing your API keys accidentally
This project is still in its early stages and we're always looking to improve, so feel free to comment with your feedback – open.source@ustwo.com.
If you want to watch the my talk from GDG Fest Porto – check it out here.
